From DNS to Delivery: Building Transactional Email with SMTPFast
Your application gets a 200 OK and an email ID. If you record that receipt as delivered, you have skipped the part where delivery actually happens. The provider still has to queue the message, hand it to a relay, negotiate with the receiving server, and report whether that server accepted or rejected it.
In this guide, you build Receipt Relay, a FastAPI application that sends a transactional receipt through SMTPFast and makes that entire pipeline visible. You start with domain verification and a direct API smoke test, then add safe email rendering, delivery polling, signed webhooks, and tests that never send a real message.
TL;DR
- SMTPFast's Connect to Cloudflare flow creates the DKIM, SPF, DMARC, and MAIL FROM records for you.
- You do not need a normal inbound MX record or an existing mailbox just to send transactional email.
- The SMTPFast dashboard currently asks only for an API-key name. Dashboard-created keys have broad access, so keep them server-side and separate them by environment.
POST /emailsreturns a correlation ID, not proof of delivery. Use that ID to retrieve the delivery trace.- Keep delivery status separate from engagement. A tracking-pixel request is an open signal, not proof that a human read the message.
- Verify webhook HMAC signatures over the raw body before parsing JSON, and deduplicate events before processing them.
Prerequisites
- Python 3.11 or later
- Git
- An SMTPFast account
- A domain you control and access to its DNS configuration
- An inbox you control for the live test
- Basic familiarity with FastAPI and HTTP APIs
- Optional: Docker for the container section
This walkthrough uses a Cloudflare-managed domain because SMTPFast provides a one-click setup for it. Other DNS providers work too; you add the same records manually.
The 200 is only the first hop
Receipt Relay has one narrow job. A user enters a customer name, recipient, order reference, item, amount, and currency. FastAPI validates those fields, renders HTML and plain-text versions of a receipt, and calls SMTPFast. The browser receives the email ID and follows its delivery trace.
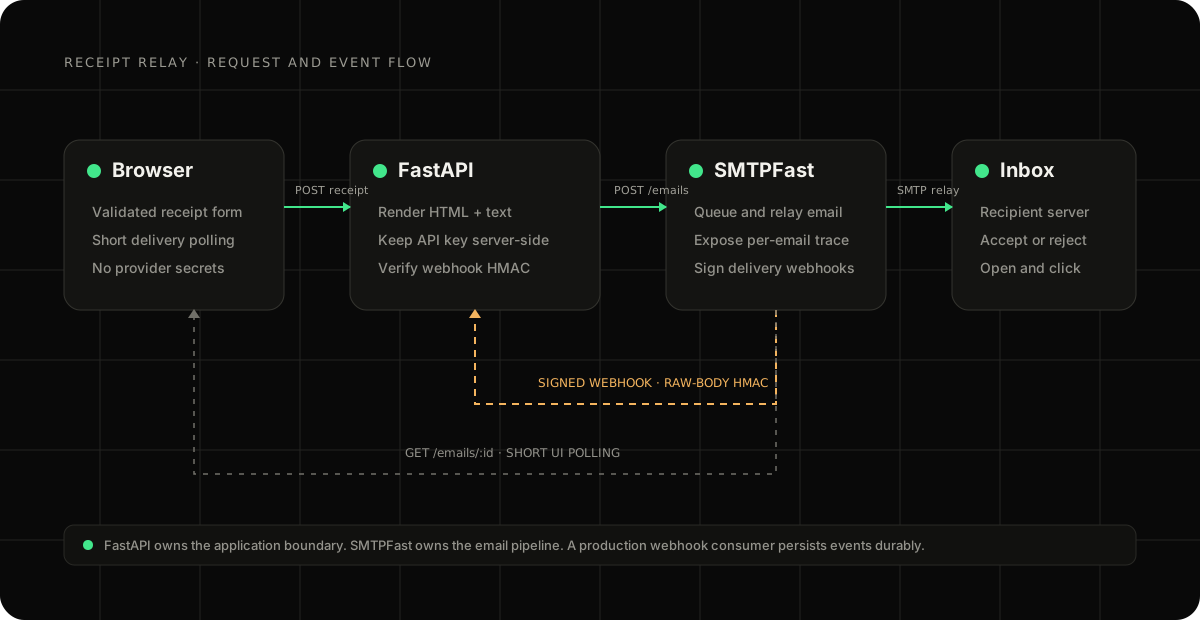
There are four boundaries in the flow:
- Browser to FastAPI. Only receipt fields and an optional demo access code cross this boundary.
- FastAPI to SMTPFast. The backend adds the API key and submits the email.
- SMTPFast to the recipient server. The asynchronous delivery work happens here.
- SMTPFast back to FastAPI. Signed webhook events report lifecycle changes without requiring an open browser.
The SMTPFast email ID connects all four boundaries. Treat it as a correlation key, not an inbox confirmation.
Set up SMTPFast before writing code
Prove the provider works before introducing application code. That gives you a clean line between DNS or account problems and bugs in your FastAPI integration.
1. Add your sending domain
Sign in to SMTPFast, open the domain area, and add the domain you want to send from. You can use a root domain such as example.com, or a subdomain such as mail.example.com if you want transactional mail isolated from other systems.
The exact from address used later must belong to this domain:
[email protected]
You do not need an existing mailbox or a normal inbound MX record just to send transactional email. The MX record SMTPFast creates on a bounce subdomain is for MAIL FROM and bounce processing; it does not create an inbox for [email protected]. If recipients should be able to reply, set reply_to to a real mailbox.
2. Connect the domain to Cloudflare
When SMTPFast detects Cloudflare nameservers, the domain page displays Connect to Cloudflare:
- Click Connect to Cloudflare.
- Review the domain and proposed records in the Cloudflare tab.
- Approve the change.
- Return to SMTPFast.
- Click Verify Now.
Cloudflare creates the records for you. SMTPFast's current setup includes:
- Three DKIM CNAME records for cryptographic signing
- An SPF TXT record authorizing the sending service
- A DMARC TXT record describing how receivers handle authentication failures
- An MX record on a bounce subdomain for MAIL FROM processing
- An SPF TXT record on that bounce subdomain
SMTPFast documents the current one-click flow and each record's purpose in its Domains documentation.
If you do not use Cloudflare, copy the records shown by SMTPFast into your DNS provider exactly as displayed. Do not reuse values from another domain. DKIM hostnames are generated for your SMTPFast domain.
There are two common manual-setup mistakes. First, keep DKIM CNAMEs DNS-only rather than proxying them. Second, publish one SPF record per hostname:
# Wrong: two SPF policies on example.com
example.com  TXT  "v=spf1 include:_spf.google.com ~all"
example.com  TXT  "v=spf1 include:amazonses.com ~all"

# Right: merge both senders into one policy
example.com  TXT  "v=spf1 include:_spf.google.com include:amazonses.com ~all"
3. Wait for verification
DNS changes are often visible quickly, but the underlying sending identity can take a few minutes to finish verifying. If the domain stays pending:
- Confirm the records exist on the correct domain.
- Check that all three DKIM CNAMEs are not proxied.
- Confirm there is only one SPF record on each hostname.
- Click Verify Now again.
- Allow more time if SMTPFast says the records are visible but verification is still in progress.
Do not debug application code until the domain is verified. SMTPFast rejects an otherwise valid request when its from address uses an unverified domain.
4. Create the API key
Open the API Keys page and click Create API Key. The current dashboard asks for one value: a descriptive key name.
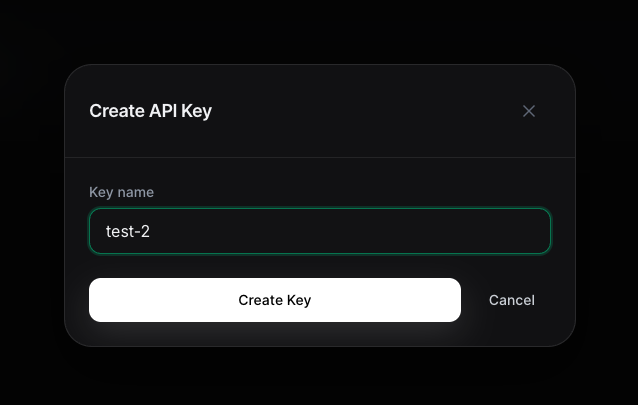
Use a name that identifies the application and environment, such as receipt-relay-local. Click Create Key, copy the generated value immediately, and store it in a password manager or secret store. SMTPFast only displays the complete key when it is created.
The dashboard does not currently show a scope selector. SMTPFast's Authentication documentation says dashboard-created keys default to all scopes, while keys created through the API can request explicit scopes.
Because the dashboard key has broad access:
- Use a separate key for local, staging, and production.
- Keep it in server-side environment variables.
- Never place it in browser JavaScript, screenshots, Git commits, or container images.
- Revoke it when the environment no longer exists.
5. Run a direct API smoke test
Export the key in your current terminal session, then send to an inbox you control. Replace both email addresses before running the command.
The first response proves that SMTPFast accepted the request. The second shows what happened later. The full response includes status, timestamps, and an events array; see the Emails API reference for the current shape.
Fix provider setup errors here, before proceeding:
| Response | Typical cause | What to check |
|---|---|---|
401 |
Missing, invalid, or revoked key | Create a new key and update the environment |
403 |
Sender domain is not verified or sending is denied | Confirm the exact from domain is verified |
429 |
Account is being rate-limited | Respect the reset or retry headers |
Build Receipt Relay with FastAPI
With the direct request working, put a small application boundary around it. The browser never receives the SMTPFast key and never calls SMTPFast directly.
The complete application is available as a reusable GitHub template:
6. Install and configure the application
Click Use this template on GitHub to create your own repository, or clone the reference application directly:
git clone https://github.com/The-DevOps-Daily/smtpfast-receipt-relay.git
cd smtpfast-receipt-relay
Create a virtual environment and install the project with its development tools:
python3 -m venv .venv
source .venv/bin/activate
python -m pip install -e ".[dev]"
Create .env from the included template:
cp .env.example .env
chmod 600 .env
Add the key and verified sender:
SMTPFAST_API_KEY=replace-with-your-smtpfast-api-key
[email protected]
SMTPFAST_BASE_URL=https://smtpfa.st/api/v1
SMTPFAST_TIMEOUT_SECONDS=20

# Added after creating the public webhook
SMTPFAST_WEBHOOK_SECRET=

# Optional shared code for a short-lived demo
APP_ACCESS_TOKEN=
Start FastAPI with the environment file:
uvicorn app.main:app --reload --port 8080 --env-file .env
Open http://localhost:8080. The page displays the configured sender but never returns either secret.
7. Validate before consuming quota
An email send is an external side effect. It consumes quota and can reach a real person, so reject malformed values before calling the provider.
class ReceiptRequest(BaseModel):
    model_config = ConfigDict(extra="forbid", str_strip_whitespace=True)

    customer_name: str = Field(min_length=1, max_length=100)
    recipient: EmailStr
    order_id: str = Field(
        min_length=3,
        max_length=64,
        pattern=r"^[A-Za-z0-9][A-Za-z0-9._-]+$",
    )
    product_name: str = Field(min_length=2, max_length=120)
    amount_cents: int = Field(ge=50, le=100_000_000)
    currency: Literal["USD", "EUR", "GBP"] = "USD"
The model makes several deliberate decisions:
EmailStrrejects malformed recipients.- The order reference uses a small, header-friendly character set.
- Money crosses the API as integer cents rather than floating point.
- Currency is an enum rather than arbitrary text.
extra="forbid"makes misspelled fields fail explicitly.
In a real checkout, accept an order ID and load the authoritative item and total from a database. Do not let a browser decide how much was paid.
8. Render safe HTML and a text alternative
Transactional messages need a useful plain-text body as well as HTML. Escape values before inserting them into the HTML context:
customer = html.escape(receipt.customer_name)
product = html.escape(receipt.product_name)
order_id = html.escape(receipt.order_id)
total = _format_amount(receipt.amount_cents, receipt.currency)
Validation constrains shape and length; it does not make a string safe for HTML. A customer named <script>alert(1)</script> must appear as text, not markup.
Build the SMTPFast payload with both bodies and two correlation values:
return {
    "from": self._settings.smtpfast_from_email,
    "to": [str(receipt.recipient)],
    "subject": f"Receipt for order {receipt.order_id}",
    "html": html_body,
    "text": text_body,
    "tags": [
        {"name": "category", "value": "receipt"},
        {"name": "order_id", "value": receipt.order_id},
    ],
    "headers": {"X-Entity-Ref-ID": receipt.order_id},
}
Tags help filter provider records. X-Entity-Ref-ID carries your application reference with the message. Neither replaces a database relationship, but both make one send easier to diagnose.
9. Call SMTPFast from the server
The client submits the payload to /emails, validates the returned ID, and records request latency:
async def send_receipt(self, receipt: ReceiptRequest) -> ReceiptAccepted:
    self._require_send_configuration()
    started_at = time.perf_counter()
    response = await self._request(
        "POST",
        "/emails",
        json=self._build_receipt_payload(receipt),
    )
    latency_ms = round((time.perf_counter() - started_at) * 1_000)

    data = response.json()
    email_id = data["id"]
    return ReceiptAccepted(
        email_id=email_id,
        status=str(data.get("status") or "queued"),
        latency_ms=latency_ms,
    )
The shared helper adds authentication only on the backend:
response = await client.request(
    method,
    f"{self._settings.smtpfast_base_url}{path}",
    headers={
        "Authorization": f"Bearer {self._settings.smtpfast_api_key}",
        "Content-Type": "application/json",
    },
    json=json,
)
The fallback queued status is intentionally conservative. The application has an ID and knows the request was accepted; it does not invent a later delivery event.
10. Keep a narrow browser-facing API
The browser submits to a FastAPI route rather than the provider:
@application.post("/api/receipts", response_model=ReceiptAccepted)
async def send_receipt(
    receipt: ReceiptRequest,
    x_app_access_token: str | None = Header(default=None),
) -> ReceiptAccepted:
    _require_app_access(runtime_settings, x_app_access_token)
    return await application.state.smtpfast_client.send_receipt(receipt)
The complete handler maps configuration, authentication, rate-limit, and upstream failures into safe application errors. It never returns SMTPFast's raw error body, which may contain internal identifiers or request data.
Receipt Relay also exposes /health without calling SMTPFast. A load balancer should be able to check the process without sending an email or making the provider a dependency of every probe.
11. Retrieve and display the lifecycle
After a send, the browser receives the email ID and calls GET /api/emails/{email_id}. The backend retrieves and validates the SMTPFast record:
async def get_email(self, email_id: str) -> EmailTrace:
    response = await self._request(
        "GET",
        f"/emails/{quote(email_id, safe='')}",
    )
    data = response.json()
    events = [
        EmailEvent.model_validate({**event, "source": "api"})
        for event in data.get("events", [])
    ]
    return EmailTrace.model_validate({**data, "events": events})
The browser polls briefly, renders values with textContent, stops after a bounded number of attempts, and leaves a manual refresh button. A typical sequence is:
queued -> sending -> sent -> delivered
- Queued means SMTPFast accepted the work.
- Sent means the sending provider accepted the message for delivery.
- Delivered means the recipient mail server accepted it.
- Bounced or failed means delivery did not complete.
Even delivered does not guarantee primary-inbox placement. The receiving system can still route the message to spam.
12. Keep delivery separate from engagement
An open or click does not make a message "more delivered," and it should not replace the terminal delivery outcome.
SMTPFast records an open when its tracking pixel is requested. Image proxies, privacy features, and security scanners can request that pixel without a person reading the email. During the live Receipt Relay test, an open signal arrived about one second after delivery even though nobody had opened the inbox.
Receipt Relay therefore keeps Delivered as the status, shows the later event separately, and labels it Open signal rather than Opened.
Do not use tracking-pixel events as proof that a person read a message. Treat them as noisy engagement signals. Automated security systems can also visit tracked links while inspecting email.
Receive and verify SMTPFast webhooks
Polling works for an interactive demo, but an application should not need an open browser to learn about a bounce. Webhooks reverse the flow: SMTPFast calls your application when an event occurs.
13. Expose a public HTTPS endpoint
Deploy Receipt Relay to your preferred platform or expose it through a trusted development tunnel. SMTPFast must be able to reach this endpoint:
https://your-app.example/webhooks/smtpfast
http://localhost:8080 exists only on your computer from SMTPFast's perspective.
14. Create the webhook
Create a standard-format webhook in SMTPFast with the public URL. Subscribe only to events your application uses:
[
  "email.sent",
  "email.delivered",
  "email.delivery_delayed",
  "email.bounced",
  "email.failed",
  "email.suppressed",
  "email.opened",
  "email.clicked"
]
SMTPFast returns a signing secret when the webhook is created. It is not the API key. Store it separately as SMTPFAST_WEBHOOK_SECRET, then restart or redeploy the application. The webhook page's test action reports the response code and response time. The current event list and retry policy live in the Webhooks documentation.
15. Verify the signature before parsing JSON
Standard webhook requests include X-SMTPfast-Signature, an HMAC-SHA256 digest of the raw request body using the webhook signing secret.
The word raw matters. Parse and reserialize JSON and you can change whitespace, ordering, or escaping, producing a different digest.
Read and bound the raw body first:
body = await request.body()
if len(body) > MAX_WEBHOOK_BYTES:
    raise HTTPException(status_code=413, detail="Webhook payload is too large.")
if not _valid_webhook_signature(body, x_smtpfast_signature, secret):
    raise HTTPException(status_code=401, detail="Invalid webhook signature.")
Compare the expected and received values in constant time:
def _valid_webhook_signature(
    body: bytes,
    signature: str | None,
    secret: str,
) -> bool:
    if not signature:
        return False
    expected = hmac.new(secret.encode(), body, hashlib.sha256).hexdigest()
    return secrets.compare_digest(signature, expected)
Only after signature verification do you parse and validate:
payload = json.loads(body)
event = SMTPFastWebhookEvent.model_validate(payload)
await application.state.trace_store.add(event)
Signature verification proves that someone with the webhook secret produced the payload. Pydantic validation separately proves that the payload has the shape your application expects. You need both.
16. Make retries safe
SMTPFast retries when an endpoint fails or times out. Receiving the same event more than once is expected behavior.
Receipt Relay uses a bounded in-memory OrderedDict keyed by SMTPFast event ID. That deduplicates retries during one process lifetime and keeps the demo dependency-free. Production handling needs a durable sequence:
- Verify the signature.
- Validate the payload.
- Insert the event with a unique constraint on event ID.
- Commit the transaction.
- Return a successful response.
- Process slow downstream work asynchronously.
Do not acknowledge an event you have not recorded safely.
Test the integration end to end
The automated suite should not consume quota, depend on DNS, or place messages in an inbox.
17. Mock SMTPFast in tests
HTTPX's MockTransport lets a test inspect the outgoing request and return a representative provider response:
def handler(request: httpx.Request) -> httpx.Response:
    assert request.method == "POST"
    assert request.url == "https://smtpfa.st/api/v1/emails"
    assert request.headers["Authorization"] == "Bearer sf_live_test"

    payload = json.loads(request.content)
    assert payload["headers"]["X-Entity-Ref-ID"] == "ORD-2048"
    assert "Ana <script>alert(1)</script>" in payload["html"]
    return httpx.Response(200, json={"id": "email_abc123"})
The escaped-name assertion tests the important HTML boundary, not just the happy path.
The webhook test signs the exact bytes it submits:
body = json.dumps(event, separators=(",", ":")).encode()
signature = hmac.new(b"whsec_test", body, hashlib.sha256).hexdigest()

response = client.post(
    "/webhooks/smtpfast",
    content=body,
    headers={"X-SMTPfast-Signature": signature},
)
Add a negative test with a bad signature. One test proves correctly signed bytes pass; the other stops verification from accidentally becoming optional.
Run the checks:
ruff check .
ruff format --check .
pytest
No real SMTPFast key is required.
18. Send one real receipt
Return to http://localhost:8080, load the example, enter an inbox you control, and submit once.
Verify the complete path:
- Receipt Relay displays an SMTPFast email ID.
- The trace advances from queued through sending and sent.
- The recipient server accepts the message or returns a failure.
- The email contains readable HTML and a useful text alternative.
- The sender uses the verified domain.
- Later engagement appears separately from delivery.
Check spam. A technically successful first send from a new domain can still be filtered; authentication is a foundation for deliverability, not a guarantee of inbox placement.
| Symptom | Likely cause | What to check |
|---|---|---|
| Authentication failure | Invalid or revoked key | Create a new key and update .env |
| Send denied | Unverified or mismatched sender domain | Confirm the exact from domain is verified |
| Rate limited | Too many requests for the account tier | Respect Retry-After instead of resubmitting |
| Delivered but missing | Recipient-side filtering | Check spam, authentication results, content, and reputation |
| Immediate open signal | Image proxy or scanner | Treat it as a pixel request, not a confirmed read |
Webhook 401 |
Secret or raw-body mismatch | Check SMTPFAST_WEBHOOK_SECRET and the unmodified body |
Run the same app in Docker
The project includes a non-root Docker image. Run the container locally with the same .env file:
docker build -t smtpfast-receipt-relay .
docker run --rm \
  --publish 8080:8080 \
  --env-file .env \
  smtpfast-receipt-relay
Use the non-sending health endpoint:
curl http://localhost:8080/health
Expected output:
{"status":"ok"}
You can deploy the same image to any container platform that accepts environment variables and exposes a public HTTPS URL. Once that URL exists, create the SMTPFast webhook, store its signing secret in the platform's secret manager, and restart the application.
Production checklist
Receipt Relay is production-minded, not production-complete. Before adapting it to a real product:
- Load trusted order data. Accept an order ID and render values from your database rather than trusting browser-submitted totals.
- Add idempotency. A double-click, worker retry, or network timeout must not send a duplicate receipt.
- Persist provider IDs. Store the SMTPFast email ID with the business record that caused the send.
- Persist webhook events. Use durable storage and a unique event-ID constraint before acknowledging delivery.
- Use real authentication. Replace the shared demo code with user- and tenant-aware authorization.
- Apply quotas. Add per-user, per-tenant, and global send limits.
- Protect recipient data. Avoid logging full addresses and bodies by default; define retention and deletion behavior.
- Enable tracking deliberately. Open and click events affect privacy and remain imperfect signals.
- Version templates. Add localization, rendering checks, and snapshot tests.
- Monitor the pipeline. Track API failures, time to delivery, bounce categories, webhook retries, and consumer lag.
What to take away
The most useful value returned by an email send is not "success." It is the ID that lets the rest of your application correlate what happens next.
Receipt Relay validates a real side effect before sending it, keeps SMTPFast credentials on the server, renders HTML and text bodies, follows each message's delivery trace, and verifies webhook events over the raw request body. The browser makes the lifecycle visible while the backend owns the provider and security boundaries.
The same pattern applies to password resets, invoices, deployment alerts, and account notifications: send once, keep the correlation ID, and design for everything that happens after the 200.
Try it hands-on
Run the commands from this article in the browser. Nothing to install.
DNS Resolution Simulator
Learn how DNS works with an interactive step-by-step simulator. Visualize the DNS hierarchy, understand caching at different levels, and see the difference between recursive and iterative queries.
Webhook Delivery Simulator
Send a webhook through a production-style delivery flow. Change endpoint responses, watch retries and backoff, inspect real HMAC-SHA256 signatures, and redeliver the same message to see receiver-side deduplication.
We earn commissions when you shop through the links below.


Svix
Webhooks as a service
Svix Dispatch sends your webhooks for you: retries with exponential backoff, signed payloads, idempotency keys, and a delivery log your customers can see.


Atomsized
AWS platform engineering and GitOps
Design and automation for reliable AWS and Kubernetes platforms, safer delivery workflows, and preview and UAT environments your engineers can understand and own.

DigitalOcean
Cloud infrastructure for developers
Simple, reliable cloud computing designed for developers

DevDojo
Developer community & tools
Join a community of developers sharing knowledge and tools

SMTPfast
Developer-first email API
Send transactional and marketing email through a clean REST API. Detailed logs, webhooks, and embeddable signup forms in one dashboard.

QuizAPI
Developer-first quiz platform
Build, generate, and embed quizzes with a powerful REST API. AI-powered question generation and live multiplayer.
Want to support DevOps Daily and reach thousands of developers?
Become a SponsorFound an issue?
Related Posts
Also worth your time on this topic
Build and Evaluate an AI Error Explainer with DigitalOcean Inference
Build a FastAPI error explainer, enforce structured model output, and evaluate models and routers against reviewed errors before choosing one.
Email Authentication: Build SPF, DKIM and DMARC, Then Break Them
Run a mail server on your laptop, send messages into it, and work out by hand why receivers accept or reject them. You sign a message with DKIM, change one character, and watch the signature fail. You separate the envelope sender from the From header the reader sees, which is the whole point of DMARC alignment. Then you send through a provider and compare its headers with the ones you built yourself.
80 minutes
DNS Basics
What is DNS and how does the DNS resolution process work step by step?
junior